Fusion Installation
Prerequisites
Ensure you have the permission stated here: Fusion Required Permissions
- Download and install Terraform. https://www.terraform.io/downloads.html (Terraform version 1.3 is the minimum required for this version of the install scripts; it was tested with 1.5.1.)
- During the deployment you will be asked to log in, but do not verify your two step authentication until after the app registration has been created (which you can see when in the script output); otherwise, you will get an error when creating the app registration.
- Before deployment, PowerShell execution policy must be set to unrestricted: run
Set-ExecutionPolicy -ExecutionPolicy Unrestricted. This setting should be reverted on a successful installation. - Get the Fusion Terraform zip from the Release page.
- In
<Path>\cloud-scaffolding\modules\azure\atom\monitoring\diagnostic_setting\diagnostic_setting.tf, ensure the two retention policy sections are commented out.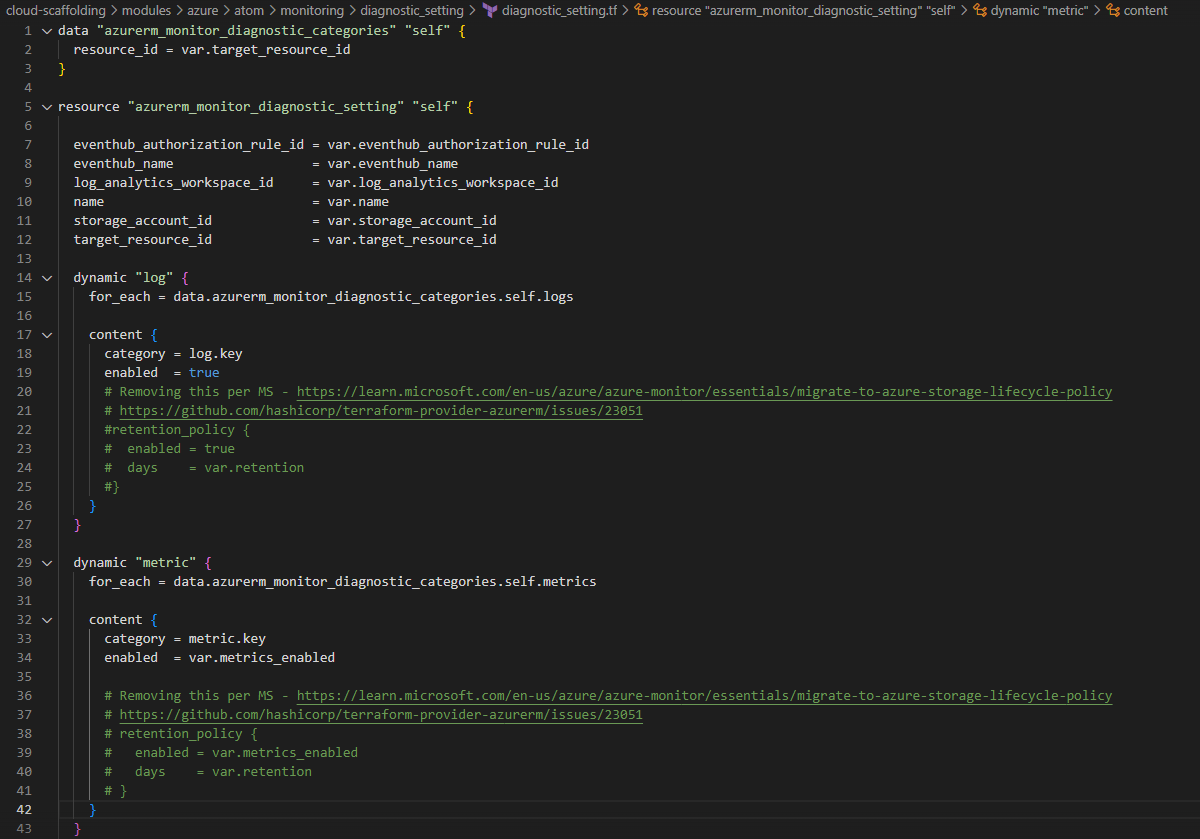
Configuration instructions
- Get all the various configuration information required for an install, this is outlined in example_consumer/example_config.json or main-direct-invocation-example.tf, these include the following:
| Variable | Description | Sample Data |
|---|---|---|
| deploymentType | Type of deployment used to ingest data: must be one of "Elevate", "Ignition", or "". | "Elevate" |
| resourceGroupName | Name of the resource group to deploy to. This value should not contain uppercase characters. | "rg-fusion-uni-9237" |
| companyName | Name of the company. This value must be globally unique and not contain uppercase characters. | "Company Name" |
| environmentType | Name of the environment type. This must be one of the following values (in all lowercase): dev test prod | "dev" #Development Environment "test" #Test Environment "prod" #Production Environment |
| tenantId | Unique identifier for the tenant of the resource group | |
| subscriptionId | Unique identifier for the subscription of the resource group | |
| essentialsAdminObjectId | Unique identifier for the "Admin-Group-Name" Azure Active Directory group | |
| adminGroupName readWriteGroupName readGroupName | The specified Azure Active Directory groups from the previous step. These groups are used for SQL Server access and role-based access to the model hierarchy UI. | adminGroupName = "Admin-Group-Name" readWriteGroupName = "ReadWrite-Group-Name" readGroupName = "Read-Group-Name" |
| sqlModelsUsername sqlModelsPassword | Default SQL user account. | sqlModelsUsername = "user name" sqlModelsPassword = "password" |
| clientId clientSecret | The Azure client ID. This can be blank if appRegistrationCount is set to 1. :::warning Using an existing App Registration If appRegistrationCount is set to 0, clientId can be set to an existing app registration client ID; however, that app registration must be configured with the correct API permissions, reply URIs, etc. as Terraform will not be managing that app reg. ClientSecret is a user configured password in plain text. A randomly generated password encoded as a base64 string is recommended. This will be auto generated if left blank. | |
| licenseKey | The license key for the product. Details for creating a license key can be found here: Creating a License Key for a Customer | |
| tagControllerCount | If you're deploying multiple Elevates per instance of Fusion, the tagControllerCount can be greater than 1. Set to 0 for Ignition or other non-Elevate deployments. | tagControllerCount = 1 |
| gapFillCount | Must be 0 as Gap Fill is not currently a supported feature. | gapFillCount = 0 |
| appRegistrationCount | Set to 1 to create a new application registration. Set to 0 to use an existing app reg; see clientId. | appRegistrationCount = 0 |
| duplicatorCount | Set to 1 to deploy a DPP function app, which is necessary for Elevate, Ignition, and some other deployments. If it is set to 0, a connection from the IoT hub to ADX (or whatever) must be made manually after deployment. | duplicatorCount = 1 |
| front_door_sku | Specify "classic" to install Front Door, or "none" to not install it. Defaults to "classic". | front_door_sku = "classic" |
| tagControllerDevSqlServer | When environmentType is "dev", this specifies whether to use a SQLite (false) or a SQL Server (true) database. Defaults to false (SQLite). | tagControllerDevSqlServer = true |
- Create a subdirectory in deployments/ under /dev or /prod and copy providers.tf, state.tf, and versions.tf from example_consumer/ to the new directory.
- Fill in the required information in state.tf for remote state storage. This will require a SAS token to be created.
| Variable | Description | Sample Values |
|---|---|---|
| resource_group_name | The name of the resource group where the backend state storage blob lives (this is not the same as the resource group in step 1) | |
| storage_account_name | The name of the storage account where the state blob will be stored | |
| container_name | The name of the container where the state blob will be stored | |
| sas_token | A Shared Access Signature token to provide access to the state storage container | Should look like sp=rwl&st=2022-02-10T00:00:00Z&se=2023-02-10T00:00:00Z&sp=https&sv=2020-08-04&sr=c&sig=TBNyft6149Vc1xAOesKH5rNll%2FjzAm%2BRds6Zn8Lyy7I%3D (not a real SAS token) |
| key | The name of the state file for this deployment | prod.terraform.tfstate |
| tenant_id | Unique identifier for the tenant of the resource group of the storage account. | A guid |
| subscription_id | Unique identifier for the subscription of the resource group of the storage account | A guid |
Direct Invocation (Follow this if you are not storing config in a key vault)
- Copy example_consumer/main.tf to the install directory and rename it to something descriptive (e.g., main.tf, product.tf, etc.)
- Fill in the respective configuration information in the inputs described in your new main file.
Pre-Installation Instructions
- If you are not already using the module version of the terraform scripts run fusion_pre_install.ps1
If you aren't sure which version of the terraform the install has used, you can run terraform state list and check if the the names of resources. If they are prefixed with module.<someModuleName> then the installation has already been updated to a new terraform version and you can skip running fusion_pre_install.ps1
- Ensure that the following Azure Active Directory groups have been created. (Note you can specify your own group names and configure them in the deployment configuration
- Admin
- ReadWrite
- Read
Installation Instructions
App Registration Pre-Install
Pre-requisites
- Create a resource group.
- The following Azure AD groups have been created (Note: groups can follow customer naming conventions).
- Read
- ReadWrite
- Admin
- Create a service principal user with the following settings.
- Owner role for resource group created previously.
- Application administrator
- Directory reader
- Directory writer
- Privileged role administrator
Below is a sample command to create the service principal user. Note: This will create the service principal but it will still need the above settings from step 3.
az ad sp create-for-rbac --name "sp-fusion-deployment" --role owner --scopes /subscriptions/<Subscription_ID>/resourceGroups/<Resource_Group>
Note the ServicePrincipalApplicationID and ServicePrincipalPassword as they are needed later.
- The user running the terraform script will need to have rights to create a storage account resource.
Software
Contact your Fusion team for the app-registration-pre-install.zip which contains the terraform files needed.
When creating the app-registration-pre-install.zip, it must contain both the app-registration-pre-install and cloud-scaffolding folders.
Run Script
-
Open an Azure Cloud Shell window either by: a. Clicking on the following link: https://shell.azure.com/ b. Clicking on the Cloud Shell icon in your Azure Portal.
-
You may be prompted to create a storage resource. If so, click on ‘Show advanced settings’ and select the target resource group names and add names for the storage account and file share.
-
Login with the service provider credentials changing the ServicePrincipalApplicationID and ServicePrincipalPassword to be those of the service provider and the TenantId to be the tenant id.
az login --service-principal -u " ServicePrincipalApplicationId" -p "ServicePrincipalPassword" --tenant "TenantId"
- Set the following environment variables substituting the correct values for your system and service provider.
$env:ARM_TENANT_ID = "TenantId "
$env:ARM_SUBSCRIPTION_ID = "SubscriptionId"
$env:ARM_CLIENT_ID = "ServicePrincipalApplicationId"
$env:ARM_CLIENT_SECRET = “ServicePrincipalPassword"
-
Upload the app-registration-pre-install.zip to the Azure CLI window.
-
Extract the files.
unzip app-registration-pre-install.zip
- Edit the main.tf file in the
app-registration-pre-install/example_callerdirectory. You can edit the file in Azure CLI by clicking the in the PowerShell menu and using the directory tree on the left to find the file. Double click on the file to open it for editing on the right-hand side. To save the file, right click on the edit pane and select save and or quit.
Change the following to match your environment:
- resourceGroupName - This should be for the resource group created previously.
- companyName - This should be lowercase and no more than 20 characters.
- environmentType - should be dev, test or prod
- tagControllerCount = 1
- readGroupName="Read-Group-Name”
- readWriteGroupName = "ReadWrite-Group-Name”
- adminGroupName="Admin-Group-Name”
- tenantId
- subscriptionId
- Change directory to
/app-registration-pre-install/example_caller.
This path may be different if the files were unzipped to a different path. i.e. cd app-registration-pre-install/example_caller
- Delete any files other than main.tf and providers.tf in this directory.
- From the Powershell command prompt, type
terraform init. - Type
terraform planto see what terraform actions will be performed. - To begin the installation, type
terraform apply. Typeyesif prompted to implement the changes. - This should complete with no errors. If not, contact your Fusion team member for help.
- From the Azure portal, check the resource group and verify that a key vault was created.
- Within the key vault, verify that the service principal is listed as an Owner role assignment.
- Check app registrations to see the newly created one. The owner of the app registration should be the service principal.
- To continue with the Fusion deployment, the Fusion team member will need to be added to the key vault created as an owner. This can be removed after deployment if needed.
Connections
Run the following commands in PowerShell to connect to Azure:
$env:ARM_TENANT_ID = "<Tenant ID>"
$env:ARM_SUBSCRIPTION_ID = "<Subscription ID>"
az login --tenant $env:ARM_TENANT_ID
az account set --subscription $env:ARM_SUBSCRIPTION_ID
Connect-AzureAD -TenantId $env:ARM_TENANT_ID
Connect-AZAccount -TenantId $env:ARM_TENANT_ID
Set-AzContext -Subscription $env:ARM_SUBSCRIPTION_ID -Tenant $env:ARM_TENANT_ID
First run
If this is the first time this terraform is being executed for a given deployment the first_run variable should be set to true. This is only for the first run of an installation, and is not required for updates.
It's recommended to set the first_run variable in the command line invocation i.e. terraform {plan, apply} -var first_run={true, false}, but this can also be set in your main tf file for that deployment. The following install instructions will omit the first_run flag from the commands but -var first_run=true can simply be added.
Navigate to the example_consumer folder in Powershell. If you are using the deployment VM, use C:\Terraform\terraform.exe init
Install instructions
- Run terraform init while in the example consumer file location
- Run terraform plan to ensure that the plan looks correct. Note: Ensure you are running with -var first_run=true or false.
- Run terraform apply and double check that the output is correct. If so type yes and run the plan.
- If any errors saying something along the lines of A resource with the ID ... already exists then run the following command using the provided ID and module path. (the message will say with module.
<module_name>....) for each resource that errored out, and then return to step 1.
- terraform import
<module_path> <resource_id>
- If this apply was run with first_run=false or had first_run set to false in the main tf file, then you are done.
- If this apply was run with first_run=true or had first_run set to true manually in the main tf file, then either change first_run to be false in the main tf file and run terraform apply again, or run terraform apply -var first_run=false after which all the first run parameters will be updated to their proper deployment values.
If during deployment one of the resources was not deployed, such as the PowerShell scripts being run against the database, terraform can run only that specific resource with the following command:
.\terraform apply -target="resourcetype.resourcename" eg. terraform apply -target="null_resource.createSqlUser"